by Cathy Monrad

MATERIALS
Burlap
Embroidery thread in desired color
Paint in desired color
Stencil of desired pattern
Garden flag pole for 12-inch flag
TOOLS
Ruler
Scissors
Marker (same color as thread)
Pins
Darning needle
2 pieces of cardboard
Painters tape
Foam stencil brush
INSTRUCTIONS
- Wash and dry burlap completely.
- Cut a piece of burlap 12 inches wide by 34 inches long.
- Fold burlap piece in half lengthwise, and pin along edges.
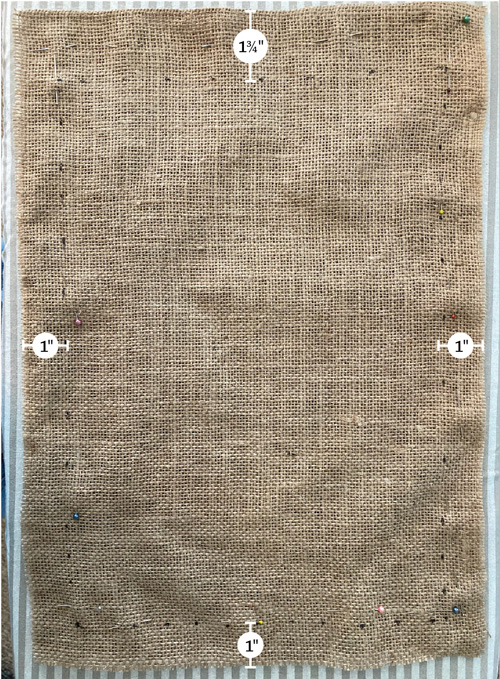
- Use marker to create a dotted line 13/4 inches from fold, and 1 inch from the sides and bottom to create a rectangle as shown in Figure 1.
- Thread needle with embroidery thread. Starting at the top left corner of marked rectangle, leave a 2-inch tail of thread on back of flag. Use a running stitch to sew along the dotted line all the way around.
- Turn flag over, knot the thread ends, and cut tails. Place a small bit of fabric glue on knot and let dry.
- To create the optional fringe look, pull 4–6 burlap threads from each side.
- Place a bead of fabric glue along burlap edge to stop fraying. Let dry completely. Turn flag over and repeat.
- Lay burlap flag right-side up on piece of cardboard and remove pins. Place stencil on flag in desired location and tape the edges down.
- Pour a bit of paint onto the second piece of cardboard. Dip foam brush into paint, then dab brush onto cardboard to remove excess paint. Stipple the brush gently on the stencil until brush is no longer offloading paint.
- Reload brush as directed above and repeat stipple technique until desired look is achieved.
- Let flag dry completely. Remove tape from stencil.
- Hang in your garden and enjoy!

Cathy Monrad is the graphic designer and garden crafter for Upstate Gardeners’ Journal.
Views: 0


